Sunday, December 17, 2017

Wednesday, December 13, 2017
I want to talk about something near and dear to hearts and that is Retopology. Yeah I know it is the word the can get you cast from the heavens, but If learned correctly it can be a valuable. For great and error free animation it is a necessary evil and I will delve into the abyss for you. While here at Full Sail University I have grown to have an appreciation for this process. If we understand the necessity we will understand the need.
 Photo courtesy of Lester Banks
There are various programs out there that will aid in your quest
for a perfect mesh. Companies like 3D Coat, Marmosat, and Mudbox are fan
favorites while the tried and true of Maya and #D Studio Max is still the
preferred. While attending school e focused on Zbrush and Maya with ZBrush
being the most preferref route. It is new in the game of retopology buy it very
effective in acheiveing the goal. It has a decent feature like ZRemesher for
faster workflow and the Z Remesher Tool can help direct edge flow.

Photo courtesy of Pixologic
To re tool traditional in Z-Brush you can use a good ol’ z-sphere.
Make sure to place it in or out of the object. Just as long as it is out of the
way. Once that is done you can use transparency to see the z-sphere and began to
the handle to create 3D planes which allows you to create a mesh. It takes some
getting use to but in the end it will be all worth it. Someday all our dreams
will come true when a software that will do all of this for you. Until then a
guy can dream! Photo from When What How.com
Saturday, September 30, 2017
Compositing and Scene Finishing Week 3
This class was highly enjoyable and peaked my interest in Compositing. This took from what I learned in Compositing Fundamentals and expounded it exponentially. We had to composite the EXR files over the background and basically troubleshoot problem areas.
Compositing and Scene Finishing Week 4
Sunday, May 28, 2017
Portfolio 4


I wanted to do something challenging for my portfolio piece this month. I used this wonderful concept illustration from Dayne Henry. A wonderful and talented artist.
Monday, February 27, 2017
Character Design and Creation
This is the short list of my accomplishments in this months class Character Creation. This course gets deeper into using Z Brush's tools and sculpting forms. I have learned so much about anatomy, fabric and cloth folds, deformation, hair, ears and first reads. This project consists of choosing two characters to model and sculpt from scratch with references. We later had to gather more references to add props for the characters as well as applying our studies of the ear, arm and leg. The month was a heavy workload for me as a new modeler and sculptor but also kept me very focused. I had a lot of fun.
Character 1


I would do a bit more planning next time and not let my excitement get ahead of my preparation. I would also think about my normals map and add a bit more facial detail because my normals map was non-existent. The only issue I came across with this model was defining the parts that make the character up. Due to the fact this character is made up and my time limit, I was able to compromise in some areas that were not essential to who the character is.
The models came out very good and I would like to revisit them in the future. I would have like to seen a bit more detail on the faces and bodies. Overall, I am proud of my first character modeling attempts.


The models came out very good and I would like to revisit them in the future. I would have like to seen a bit more detail on the faces and bodies. Overall, I am proud of my first character modeling attempts.
Prop 1 Glove

This is one of the first props I made for my models. I never model a hand before let alone one modeled in Z Brush. As much as a powerful feature Dynamesh is, it just was not coming out the way I envisioned it. I found what worked for me was using z-spheres to get the shape I desired from the reference. I think next time I will start with something I am comfortable with to avoid wasting time trying make something else work.
One major issue I had with z-spheres was getting the spheres to act independently of each other. For some reason they linked together and when I pulled or moved one the corresponding sphere would react. I decided to scour the Internet until I found a very informative video about z-spheres that spoke to me and I finally grasp the concept. After getting the shape I wanted I then used Dynamesh to tweak it more. Overall I feel I did a very good job even though this was the first time I have ever built and sculpted something entirely in Z Brush.
Prop 2 Backpack

This is probably my favorite of my props. Not because I think it looks spectacular it is because it was the one that challenged me the most. What I thought worked so well this is it made me really find out how the brushes worked in Z Brush. I got the hang of masking and tried to mix hard and soft surface modeling. What did not work so well was figuring out the folds and wrinkles. My particular challenge was to give it a realistic look of fabric with depth and weight.
I think what I would do different with something like this next time is be more loose with my strokes. I feel I was being too rigid and precise with the folds placements drowning its organic feel.
The only issue I ran into were the buckles because I am not that good with hard surfaces in Z Brush yet. Along with the bag I modeled everything else in Maya then exported into Z Brush for sculpting.
I feel I achieved the look I was after but wish I had more time to explore this model. More attention to the stitching, deformation in the back and the piping would bring the look out more. Overall it was a great experience.
Sunday, November 20, 2016
Virtual Art Gallery

My Virtual Art Gallery for my Art History course. Enjoy!
Monday, May 2, 2016
MCR Week 4 Final Scene
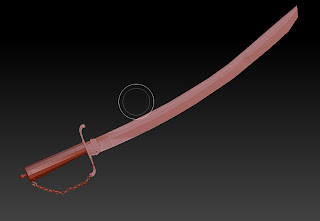
I would be lying if I said that this month was easy. I have never worked so hard in school in my life. I can honestly say that all the stress and late night were worth it. I've become a stronger and more confident modeler and the skills I obtained these past four weeks are tremendous. This final week we had to compose a scene with all of our models and 3 additional ones using all the skills we had acquired up to now.


I can also say that this week is a milestone for me because I was finally able to do a fourth model. It was all due to better time management, planning and getting better with Maya and Z-Brush. I think my final scene is a very worthy effort and I hope that my instructor feels the same. This month has taught me a lot about myself and my goals. I am determined more than ever to get a firm grasp on these concepts. I am looking forward to my next class.




Monday, April 25, 2016
MCR Week 3 Still Life With Digital Sculpting
This week is an exciting week for me because we are diving into Z-Brush for the first time. I've been waiting for this since I started Full Sail. Even though it is not an extensive lesson in the software I plan on getting a lot out of it. Again we had to choose three objects to model but this time we had to import the .obj into Z-Brush for projection and sculpting in some details. It took some time to navigate comfortably through the software and once I got the hang of it and using masks help me hone in on some things.


I really liked this week and feel myself getting better. I had to stay up all night to get my assignment done but that was because my job had me spinning too. I learned about normal maps and its benefits. Overall my excitement level has remained high and I feel very proud of my work so far.


Monday, April 11, 2016
MCR Week 2 Still Life
I thought last week was tough, but this second week has got my head spinning. We had to choose three model to create from reference photos. They were mostly 3/4 view and we had to get them as close as identical as we could. This would have been easy with more usable references but these were some complex models to a newcomer like me. We also started UVing our models also this week. One major lesson I learned was to add edge loops after UVing the model. That was a nightmare to UV all those surfaces.The models I chose were to help me with my weaknesses in areas like curves and scale.

We had the option to model a fourth object for extra credit but my time was vastly short. Between working a full time job with deadlines and homework it was impossible for me to start and finish fourth. Maya still exhibits a personality of its own but I am getting used to it now. I use the Edge loop tool a lot more along with the Knife tool. Modeling is still quite challenging but I will press on and get better.


Monday, April 4, 2016
MCR Week 1 Model Large Props
This week start a new chapter in my path to become a character animator. This month is MCR (Model Creation). Our first assignment was to make four large 3D models to populate a room. This was definitely a hectic week. I'm still a little shaky with Maya but I think all it would take is more practice. I learned a lot through our Concept Share site with all the critiques and advice. I started using the quick keys more and can see how it can make things a lot faster. This week was all about experimenting and I should start to lock down a work flow next week. My models turned out ok and I'm feeling a bit more confident.


Monday, March 21, 2016
Art 01 Week 3 Light and Value
This week's assignment 3H was based on light and value. This by far was my favorite week because I am a traditional artist and I love the process of polishing a sketch. Sometimes it is hit or miss, but worth it in the end. I chose to compose and sketch this image because I rarely render plastic and metal materials. This was a supposed to be more of a challenge to my skill level than just ordinary homework. I am satisfied with how it turned out and if I had enough time, I could have honed it in more. In learning about value, I quickly associated it as my color palette to black and white. My brain can work better when I think of colors. With the month winding down I am happy with learning new things and ways to approach my art.

Sunday, March 13, 2016
Art 01 Week 2 Defining Space
This week I really had to focus on composition and organizational lines. These were things I was familiar with already, but I don't mind any refreshers. Especially when drawing still life which I haven't done in years. This also helped me with my fundamentals which I readily admit I do not always adhere to. I still get the results I want, but it's good to have a base to fall back on when I get stuck in the design process. Assignment 2F was great because I got to loosely sketch in my project, which is my favorite part, and show its plum lines to keep my proportion and scale in harmony.


Sunday, March 6, 2016
Art 01 Week 1 Composition
This week is the start of Fundamentals of Art 1. It starts with getting us more familiar with composition and the principles of design. Using these principles I saw my work start to show a more interesting view. I can see how things can become more engaging and dynamic using the Golden Rule and the Rule of Thirds. Our first week of assignments 1E and 1F had a mixture of traditional art sketching and photo composition using those rules. This assignment was fun and it taught me how to direct the art movement in the audience's eye. I am looking forward to future assignments.


Monday, February 29, 2016
3D Foundations Week 4 Presentation
This was the final week of 3DF. It was an eye opening experience. The preparation that goes into a single model can be very demanding. I found the whole UV process fun but very challenging. In my presentation I tried to compose a murder mystery mood and scene. In doing so, I begin to get more comfortable with Maya's interface. I started to use the short cut key a lot more also. Over all it was a successful month for me. The only thing that I need to still work on is my time management. It's not a major issue but having a full time job does make this journey more challenging. I will correct my past mistakes in my next class.

Render

Presentation
Saturday, February 20, 2016
3D Foundations Week 3 Clean Up
I hate cleaning but it has to be done. This week we are focusing on model clean up. We have been introduced to the many pitfalls of a modeler. Overlapping vertices, N-gons, and 4 sided faces will all pay us a visit and how to eliminate and fix them will be key to being a great modeler. I must admit, this has been the most elusive problem for me because I 'm still having problems fixing some issues. This week's exercise helped a lot in identifying those specific issues and I was getting more comfortable in dealing with them.

The models I chose were more challenging than the week before. Not sure which were my best, but I'm leaning toward the camera because it took the most time and I was more comfortable modeling at that point. I just need to work on getting my curves smoother and stop being so faithful to the references. I must learn that it's ok to stray from the original as long as the form is still recognizable. My workflow has gotten better but due to getting sick, my schedule was upset so I found myself trying to catch up.

All in all, it was a productive week and I am looking forward to the final week of texturing. I'm hoping this will go smoothly because from what I have read from this week's readings, is this is the area that will get you noticed and hired.


The models I chose were more challenging than the week before. Not sure which were my best, but I'm leaning toward the camera because it took the most time and I was more comfortable modeling at that point. I just need to work on getting my curves smoother and stop being so faithful to the references. I must learn that it's ok to stray from the original as long as the form is still recognizable. My workflow has gotten better but due to getting sick, my schedule was upset so I found myself trying to catch up.

All in all, it was a productive week and I am looking forward to the final week of texturing. I'm hoping this will go smoothly because from what I have read from this week's readings, is this is the area that will get you noticed and hired.

Monday, February 15, 2016
Industry Influence
There has always been someone that makes us feel like we are further away from greatness. That person for me has been concept designer Ian Joyner. Every since I first saw Marvel Alliance, it has been my inspiration to attain that level of creativity and talent. Ian Joyner has had a notable and an impressive resume with work on Power Rangers (2017), Suicide Squad (2016), Amazing Spiderman (2012) and Avengers (2012). He is an example, to me, of having a well-rounded background with unlimited talent.
I have been an avid fan of his for 10 years and have bought his tutorials from Gnomon Schools. Those have given me the much-needed education and inspiration I still use to this day. What I find so fascinating about him is his versatile skill set. He has made sure he is knowledgeable in many areas of the entertainment industry such as puppet design, computer generated characters for movies, and video game cinematics. Joyner use of character design, sculpting and modeling are something I feel I should have in my arsenal as well. I plan to take advantage of every piece of advice he can offer along with the education and practice I will receive from Full Sail University.
The images below show the talent and attention to detail that he shows for the video game Marvel's Ultimate Alliance and A Gentleman's Duel. The textures and color are vividly deep and beautiful. The block outs and modeling are flawless.


All images courtesy of Blur Studios
I have been an avid fan of his for 10 years and have bought his tutorials from Gnomon Schools. Those have given me the much-needed education and inspiration I still use to this day. What I find so fascinating about him is his versatile skill set. He has made sure he is knowledgeable in many areas of the entertainment industry such as puppet design, computer generated characters for movies, and video game cinematics. Joyner use of character design, sculpting and modeling are something I feel I should have in my arsenal as well. I plan to take advantage of every piece of advice he can offer along with the education and practice I will receive from Full Sail University.
The images below show the talent and attention to detail that he shows for the video game Marvel's Ultimate Alliance and A Gentleman's Duel. The textures and color are vividly deep and beautiful. The block outs and modeling are flawless.


All images courtesy of Blur Studios
Saturday, February 13, 2016
3D Foundations Week 2 Components
I thought last week was informative and this week was even more challenging. I was introduced to the world of components. Particularly, the extrude tool which has quickly become my most worn out hot-key. The second step to successful modeling has been my secondary forms. That meant breaking things down in whole parts and then modeling. This was accompanied by the saying "Model how it is." This was a more time-consuming process than I anticipated and I definitely will plan out my time better next week.

I wanted to challenge myself a little more, so I choose some models that would push me a little further.They did their job and I'm a better modeler for it. I'm starting to become more familiar with Maya's tools and getting a better understanding of shapes. I want to start focusing on a quicker workflow. At times, I found myself spending too much time in a certain area and began to work longer than I thought I should have been.

I look forward to the asset approval for this week to see if I am on the right track. Judging from the progression from the first week, I really need to focus on my weaknesses and spend some more time in the lab.


I wanted to challenge myself a little more, so I choose some models that would push me a little further.They did their job and I'm a better modeler for it. I'm starting to become more familiar with Maya's tools and getting a better understanding of shapes. I want to start focusing on a quicker workflow. At times, I found myself spending too much time in a certain area and began to work longer than I thought I should have been.

I look forward to the asset approval for this week to see if I am on the right track. Judging from the progression from the first week, I really need to focus on my weaknesses and spend some more time in the lab.

Sunday, February 7, 2016
3D Foundations Week 1 Blocking
Done with the first week of 3D Foundations. It was quite the experience and I have learned a lot about Maya. I was a little intimidated by it at first because I wanted to dive right in and do something cool. That was not the case, we had videos to watch describing the process we were using this week and I must have watched those things like 10 times just to comprehend what was going on. I still feel a little unsure but access to the lab, in Google hangouts, has helped me out tremendously along with the lectures.

The models I chose were fairly simple and something just to get my feet wet. I had a great time trying to figure out the shapes and put them together in a sensible way. This week's practice helped out a lot also because it reinforced what we were doing for the week. I also got introduced to references and the benefits they have in modeling something correctly. I never knew it but blocking is a critical stage for me getting the form correct and it will definitely be a part of my workflow from now on. Going into next week I will feel a little bit more confident.


The models I chose were fairly simple and something just to get my feet wet. I had a great time trying to figure out the shapes and put them together in a sensible way. This week's practice helped out a lot also because it reinforced what we were doing for the week. I also got introduced to references and the benefits they have in modeling something correctly. I never knew it but blocking is a critical stage for me getting the form correct and it will definitely be a part of my workflow from now on. Going into next week I will feel a little bit more confident.

Monday, February 1, 2016
New Beginnings

It was a very eventful week. Getting started with modeling was something I have looked forward to since I started at Fullsail. Getting my Launch Box was cool but there was so much to set up. I'm sure glad that it came with tons of instructions and support. Needless to say, I finally got everything situated after two days. I am now up and running and ready to start modeling.


Looking forward to this first challenge of blocking out using references. Other times I have attempted to try 3d modeling I often jumped right in with little to no prep work. This is different because I am approaching it with a systematic approach. I feel confident with the instructor and feel this is the right course of action for me. Hope it doesn't get too difficult in the future!

Image courtesy or apple.com
Image courtesy of cgartstuff.com
Image courtesy of seeklogo.com
Subscribe to:
Posts (Atom)